The Ultimate Field Guide: How to Improve Poor Soil Quality for Maximum Yields
In commercial agriculture and high-value plantation management, your single greatest asset isn’t your machinery, your irrigation infrastructure, or even your seed genetics. It is the complex, living ecosystem beneath your boots. In this article, we operate on a fundamental truth: “Success starts from the ground up”.
Many growers treat soil as a passive anchor for roots—an inert medium to hold plants upright while synthetic inputs do the heavy lifting. This approach is not only financially unsustainable, but it also leads to long-term land degradation. Poor soil quality is the root cause of stunted crop development, high pest vulnerability, nutrient leaching, and disappointing harvests.
If your land is struggling with compaction, low organic matter, poor drainage, or nutrient depletion, your plantation is operating under its true potential. This comprehensive, data-driven guide will walk you through the precise science and practical strategies needed to diagnose, remediate, and transform poor soil quality into a thriving, high-yield agricultural powerhouse.
1. Diagnosing the Problem: The ARAGROSOLUTION Soil Health Audit
Before investing capital into amendments, fertilizers, or field modifications, you must understand exactly what is wrong with your ground. In precision agriculture, guessing is an expensive mistake. A professional soil audit examines three core pillars:
- 1. Physical Structure
- 2. Biological Vitality
- 3. Chemical Balance
The AR Jar Test (Physical Evaluation)
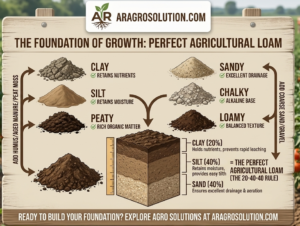
To understand your soil’s physical limitations, you must determine its texture. Healthy agricultural soil typically follows the “20-40-40 Rule” that means it is the proper mix of 20% Clay, 40% Silt, and 40% Sand. This ideal mixture is known as “Loamy Soil“.
You can easily run a physical evaluation using our straightforward DIY jar test:
1. Extract: Dig down to root level—approximately 6 inches—in the zone you wish to test. Collect enough soil to fill a straight-sided glass jar (such as a mason jar) between one-third and one-half full.
2. Hydrate: Fill the jar to its shoulder with clean water. Let it sit for a few minutes so the dry earth completely absorbs the moisture.
3. Agitate: Secure the lid tightly and shake the jar vigorously for 3 minutes to break down tightly packed aggregates.
4. Measure Sand (1 Minute): Set the jar down on a flat surface. In exactly 60 seconds, use a ruler to measure the coarse sediment that settles at the very bottom. This is your sand content.
5. Measure Silt (5 Minutes): Wait an additional 4 minutes (5 minutes total from the time you set the jar down). Measure the next distinct layer of sediment. The difference between the first and second measurements represents your silt content.
6. Measure Clay (24 Hours): Let the jar sit undisturbed for a full day. The water should clear, leaving a fine, dense layer at the top of the column. The difference between your second and final measurements reveals your clay content.
By calculating the percentages of each layer relative to the total height of the sediment, you can identify if your soil leans too heavily toward sand, silt, or clay.
The Earthworm Audit (Biological Evaluation)
While the jar test analyzes the physical framework of your land, the ‘Earthworm Audit’ measures its biological pulse. Earthworms are ecosystem engineers; their presence is a direct indicator of beneficial microbial activity, subterranean aeration, and available organic carbon.
- 1. The Test: Dig a test hole exactly 1 foot wide, 1 foot long, and 1 foot deep in your cultivation area. Carefully sift through the extracted earth.
- 2. The Benchmark: In healthy, fertile soil, you should find at least 10 active earthworms in that single scoop.
- 3. The Diagnosis: Finding fewer than 10 worms indicates that your soil is biologically depleted, starved of organic inputs, and suffering from a lack of microbial diversity.
Chemical and pH Analysis
The final diagnostic layer involves evaluating chemical suitability. If your soil’s pH is unbalanced, it creates a phenomenon which known as Nutrient Lockout. Even if your soil is rich in nitrogen, phosphorus, and potassium, an extreme pH makes these vital elements chemically unavailable to your root systems. Most commercial crops, particularly high-value options like tomatoes, prefer a slightly acidic to neutral pH range of 6 to 7.
2. The Core Solution: The Power of Organic Matter
If your diagnostic audits reveal low worm counts, poor structure, or nutrient depletion, the universal primary remedy is the systematic integration of high-quality **Organic Matter (OM)**. Organic matter behaves as a biological catalyst, correcting the structural flaws of every major soil type.
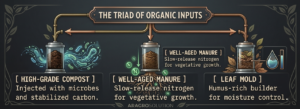
High-Grade Compost
Compost is highly decomposed vegetable matter that introduces billions of beneficial bacteria and fungi into your fields. It stabilizes soil aggregates, increases the cation exchange capacity (CEC), and allows your soil to hold onto applied fertilizers instead of letting them wash away into the water table.
Well-Aged Manure
Aged livestock manure is an excellent structural and chemical enhancer. It must be completely composted or aged for several months before application; raw manure contains high salt concentrations and volatile ammonia compounds that can scorch tender root systems and introduce weed seeds to your plantation. When properly cured, it supplies a steady, slow-release stream of primary macronutrients while improving the soil’s “crumb” texture.
Leaf Mold
Created by allowing fallen leaves to decompose under cool, fungal-dominated conditions, leaf mold is an exceptional conditioner for water management. It can hold up to several times its own weight in water, making it a powerful resource for drought-proofing light, sandy fields.
3. Targeted Remediation by Soil Type
There is no one-size-fits-all remedy in modern agriculture. To achieve maximum yields, you must match your specific soil diagnosis with a targeted engineering strategy.
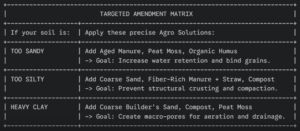
Correcting Thirsty, Leachy Sandy Soils
Sandy soils are composed of large, gritty particles with minimal surface area. While they offer excellent drainage and warm up rapidly in the spring—making them popular for early-season crops and root expansion—they cannot retain moisture or nutrients effectively.
The Problem: Water moves through sand rapidly, dragging soluble nitrogen and potassium away from the root zone before the plant can utilize them.
The Strategic Solution: Incorporate generous layers of peat moss and aged manure. Peat moss fills the large gaps between sand grains, working like a biological sponge to trap water. Aged manure provides the sticky humid acids needed to bind loose sand particles into stable aggregates, dramatically increasing the soil’s overall nutrient-holding capacity.
Managing Compaction-Prone Silty Soils
Silt consists of intermediate, flour-like particles. It is highly fertile, but because the grains are smooth and uniform, they run the risk of washing away or packing together into an impermeable crust when exposed to heavy rain or overhead irrigation.
The Problem: Silty soil easily loses its structure, forming a hard surface barrier that prevents water infiltration and hinders seed emergence.
The Strategic Solution: To stabilize silty fields, apply a combination of coarse sand (sharp builder’s sand, never smooth beach sand) and well-rotted horse manure mixed with fresh straw. The fibrous straw and coarse sand build a durable structural framework within the fine-grained silt, preserving vital air passages and preventing surface crusting.
Breaking Down Heavy, Suffocating Clay Soils
Clay is composed of microscopic, plate-like particles that pack together tightly. While clay is an immense reservoir of essential minerals and holds water better than any other medium, its physical density can easily suffocate roots.
The Problem: Clay soils waterlog easily, driving out oxygen and creating anaerobic conditions that breed destructive root-rot pathogens. When dry, clay bakes into a concrete-like crust that stops root expansion.
The Strategic Solution: Remediate clay fields by aggressively integrating coarse sand, high-quality organic compost, and peat moss. The coarse sand creates macro-pores that allow water to drain and oxygen to enter. Simultaneously, the compost separates the dense clay plates, transforming a heavy, unmanageable field into a workable, crumbly tilth.
4. Advanced Mechanical and Biological Practices
Amending your soil with physical inputs is only half the battle. To maintain long-term **Agricultural Resilience**, you must adopt field management practices that protect and preserve your soil’s improved structure.

Cover Cropping: The Living Amendment
Never leave your agricultural soil bare between cash crops. Bare soil is exposed to direct solar radiation, which cooks beneficial microbes, and heavy rains, which erode topsoil. Cover cropping fills these gaps by using specific plants to actively improve soil architecture:
1. Legumes: Form symbiotic relationships with Rhizobium bacteria to draw nitrogen gas from the atmosphere and fix it into the soil, reducing your dependence on synthetic fertilizers.
2. Daikon Radishes: Feature thick, aggressive taproots that punch through dense subsoil and compacted clay layers, naturally opening up pathways for water and air without mechanical disruption.
Minimal Tillage: Preserving Soil Architecture
While traditional farming heavily relies on frequent, deep disc-ploughing to prepare planting beds, excessive tillage destroys the natural soil structure. It shatters stable soil aggregates, obliterates earthworm networks, and exposes buried organic matter to rapid oxidation, quickly depleting your carbon reserves.
Transitioning toward minimum-till or no-till systems preserves the delicate macro-pores created by biological life, ensuring long-term water infiltration and root health.
Strategic Mulching
Applying a thick layer of organic mulch—such as clean straw, wood chips, or shredded crop residues—shields the soil surface from extreme weather. Mulch cushions the impact of heavy rain droplets, preventing erosion and structural compaction. It also lowers soil temperatures during intense summer heat, preserving the cool, damp habitat that earthworms and beneficial microbes need to thrive.
5. Tailoring Your Foundation for Specific Crops
Once you have established an amendment strategy, your final step in precision agriculture is aligning your improved soil profile with the specific physiological needs of your target crops.

The Premium Tomato Plantation Profile
Tomatoes are heavy feeders that require an impeccable balance of nutrients and moisture. They are highly susceptible to physiological disorders like blossom end rot, which is caused by calcium deficiencies linked to erratic water delivery.
Soil Target: A well-aerated, rich loamy mixture with a stable pH between 6.2 to 6.8 .
Management: Incorporate deep compost layers to provide a steady supply of micronutrients, and ensure your drainage infrastructure avoids stagnant water around the root zones.
The Peanut and Root Crop Profile
Peanuts, carrots, and potatoes develop entirely underground. If the soil is heavy, compacted, or stony, underground growth is restricted, resulting in deformed root structures and severely reduced yields.
Soil Target: A loose, well-draining sandy loam profile.
Management: Keep the top 8 inches highly friable by adding coarse sand and organic humus, allowing peanuts to easily peg and mature below the surface.
The Leafy Green and Allium Profile
Crops like spinach, lettuce, and garlic have relatively shallow root systems and fast vegetative growth cycles. They require immediate, easy access to water-soluble nutrients.
Soil Target: A highly fertile, moisture-retentive silty loam.
Management: Focus on heavy, surface-level applications of well-composted organic matter and leaf mold to support rapid leaf development and bulb expansion.
Summary: The Path to Agricultural Resilience
Improving poor soil quality is a continuous process that requires patience, observation, and science-backed interventions. Healthy gardens and high-yield commercial fields never happen by accident; they are carefully built from the ground up.
STEP 1: RUN THE DIAGNOSTIC AUDITS
Execute Jar Test & Earthworm Counts
⇓
STEP 2: APPLY TARGETED AMENDMENTS
Add customized organic inputs and sand
⇓
STEP 3: DEPLOY REGENERATIVE TACTICS
Implement cover crops and no-till
⇓
MAXIMUM AGRICULTURAL YIELD
Stronger crops and robust harvests
By taking the time to test your soil texture, measure biological activity, and apply targeted physical and biological amendments, you move past the costly cycle of troubleshooting symptoms. Instead, you address agricultural challenges at their source. Your soil is a living community; treat it with precision, and it will reward you with stronger plants, superior harvests, and consistent growth season after season.
Improving soil doesn’t always require expensive inputs. Small, consistent practices can make a noticeable difference over time.
1. Add organic matter regularly
Incorporating compost, farmyard manure, or green manure improves soil structure, boosts microbial activity, and increases nutrient availability. This is especially useful for sandy and degraded soils.
2. Maintain proper pH balance
Soil pH directly affects nutrient absorption. Lime can be added to acidic soils, while gypsum helps reclaim alkaline or saline soils. A simple soil test once a year can guide the right correction.
3. Practice crop rotation and cover cropping
Growing the same crop repeatedly drains specific nutrients. Rotating crops—especially including legumes—naturally restores nitrogen levels and improves soil fertility.
4. Improve water management
Avoid both over-irrigation and water stagnation. Drip irrigation, mulching, and proper drainage systems help maintain optimal moisture without damaging soil structure.
For farther information and clear concept you may watch this videos….


Leave a Reply